Thursday, March 20, 2014

- Go Out In the Yard and Play: Hauling rocks the easy way

Being an inveterate reader as a child, I often heard my mother say "Why don't you go outside and play?"

"Why?" I would wonder. To this day, I need to be motivated to put down the book, stop stitching, get out of the kitchen, or finish the latest blog post and get outside. But this week, with the belated arrival of spring weather and our new gardening toys, it hasn't taken nearly as much coaxing to get me out the door.

Our latest garden project has been creating a new front walk to replace the paving stones that were moved to the end of the driveway (Rock 'n' Roll). As you can see, their departure left behind a fair mess.


Don arranged to have 3 cubic yards of decomposed granite delivered by Gardenville, then he began the heavy work of digging out the buffalo grass sod and relocating it to bare patches in the lawn.

His reward? Once the path was cleared  and the granite was laid in, he got to use his new tamper ...


while I kept busy hauling rocks from the floodplain to edge the path. In the past, that meant bumping a wheelbarrow up and down the east trail ... hard work and not much fun.


I figured there had to be a better way. Now Carl Sagan once said "They laughed at the Wright Brothers, but they also laughed at Bozo the Clown."  Indeed, Don mostly laughed when I told him my idea for an alternative to the wheelbarrow. 

I can't claim credit for the idea, which was suggested by one of our tree trimmers (who also seemed to be exceptionally good at taking the path of least resistance). However, I'm pleased to report that I got the last laugh: $15 for a plastic cement mixing tray at Lowe's and an old piece of rope resulted in a modern-day sledge that is actually fun to pull over hill and dale. It fairly skims over the rocks and roots that used to stop the wheelbarrow dead in its tracks. And I'm getting a seriously good workout since I can manage far more trips than ever before.

I also get double-duty out of each round-trip by cutting out prickly pear cactus along the way to the floodplain ...

Note the yard stick scale: the tray is about 2' x 3'

then depositing the water-laden cactus pads on one of the three new compost piles along the east trail (there are three more compost piles closer to the house ... we're big into turning yard waste into black gold). While cactus pads will reroot themselves if left in contact with the ground, we have found that burying them deep in live oak leaves (next week's project) ensures that they decompose instead, although the process takes at least a year.


In the end, thanks to the new tamper and stone delivery systems, Don was able to finish the new front walk in just a few days. The decomposed granite base is far better (read safer) than the old hump-backed paving stones ever were and the firmly tamped surface should keep any granite from being tracked into the house. Now on to the oak leaves!


Tuesday, March 18, 2014

- Needling details: Close up views of the family sampler

I ended yesterday's post with my latest family sampler, then realized I neglected to include detail shots. Having seen both good and not-so-good needlework photography online, I decided to rig up a light box. What appears below is as much about my photography learning process as it is about the needlework.

Scanned image created on our HP Photosmart 7520 printer.
Except for cropping, the image has not been altered.


This is a cropped version of the scanned image, which doesn't show the colors as accurately, even after editing.

This was photographed using the light box, then brightened, straightened and cropped in the photo editor.
The pictures that follow have varying degrees of brightening and cropping.

This detail of the Cape Hatteras Lighthouse was cropped fairly tight.
Note the hemstitching on the right.

The cropping on the UT Tower is even tighter.
Longhorn fans please note the "1" in the windows.

This is the tightest crop, close enough
to see the French knot on the
top of the Montauk Lighthouse,
but the details are beginning to blur.

Back stitched dunes, double running stitch oat grass on top.
Note how the pale green of the grass is hard to see.

A closer view, including the waves and sea gulls

Queen stitch cookie ...
same blur with the tight cropping.

Border stitch details: satin stitch
large cross stitch with smaller stitches
on the arms, more satin stitch.

Eyelet stitch lettering (red), cross stitch (green)
and double running stitch stems with straight stitch flowers.

Some final notes: the ground fabric is a 42-count linen (42 threads per inch). In the future, I may include a measure of some kind to indicate relative scale. I also need to photograph the same image at different times of day, with different lenses, and with different kinds of lighting, particularly to see how it affects color. I'll try all of the above (and whatever else I can think of) in a future post on my slow cloth adventures.

Monday, March 17, 2014

- Sampling life: A family in stitches

I want to take yesterday's story back a bit to my brief sojourn at the needlework shop in Williamsburg's Merchants Square. While I was there, I did finally begin to create my own needlework rather than relying on kits. This piece hung in my parents' home for over 30 years.

A 25th anniversary sampler designed for my parents and stitched in 1978

Detail of the house where I grew up: 15 Fairview Avenue, East Williston, NY

Once I began developing the needlework program at Colonial Williamsburg in 1980, my focus shifted to making authentic reproductions of 18th-century needlework. Kathleen B. Smith (who is still in business) was a major contributor to my success, putting me on to appropriate linens, silks, and worsted wools hand-dyed using authentic 18th-century methods and materials. The only needlework I have that dates from that period is this canvaswork pincushion, made with her worsted wool (which is still available on her website). 

The colors are as bright and true today as they were 30 years ago. 

Stitch detail

Sadly (in retrospect), CW soon promoted me to a management position where I was responsible for all the textile-related crafts: spinning, weaving, millinery, wigmaking, and tailoring. While the promotion meant more money, it left me with far less time for research and needlework. After having our first child, I realized I couldn't be a good full-time manager (which was what I had become) and have enough energy and enthusiasm left over to be the kind of parent I wanted to be. So I left to become a full-time mom and made needlework on commission to earn some extra cash.

That didn't work out so well either. After a year or so, I returned to the library world part-time, got my degree, and proceeded to develop a new career. Every so often I found time, particularly during vacations, to do needlework. But I was no longer satisfied with copying any one person's work exactly, whether in kit form or as a reproduction. As my parents' 40th anniversary approached, I began another sampler, this time with historic sampler design elements culled from many of the books in my personal library.

Silk on linen, begun in the late 1980s

The acorns and birds are worked in double-running stitch on the 3rd row
and cross stitch over one thread on the 6th row.
In order to work the details on Adam and Eve, each stitch
covered one thread of the 34-count linen (34 stitches/inch)
Close-up detail

This deer from an 1598 English sampler will be recognizable to
anyone who has ever browsed through books on historic needlework.
The Latin phrase roughly translates to "Time flies when you're having fun" ...
a wry self-commentary on the fact that the sampler took over 10 years to complete

That was then, this is now. My most recent sampler, made after I retired from librarianship last June, took mere months to complete and awaits its rightful place on the wall.


Seeking the next best thing to try, my Pinterest searches inspired an exploration of slow cloth and a return to the simplest needlework: running stitch. To be continued - - - - - - - - - - - -

Sunday, March 16, 2014

- Show Your (needle)Work

Austin Kleon gave a great keynote at the South by Southwest (SXSW) conference in Austin last week, much of it focused on his newly published book entitled Show Your Work. He said, among many other things, that it can be as important to share the creative process as the end product. Well, I've been taking up the challenge ever since by posting new/old material to the blog and pinning pictures onto Pinterest.

Since the post on my family sampler (A Closer Look) has been getting a fair number of hits, I thought it might be a good idea to look back on my needlework roots, which have been growing for 50 years. Sadly, much of my work has been lost, having been given as gifts or simply worn out. But there's enough to make a go of it.

My mother and grandmother used to make tablecloths and pillowcases from kits with large blue cross stitches printed on them. At age 7 or 8, I got my first kit: a whaling picture, which I completed and gave to my godmother. All I remember of the details is thinking it was incredibly cool to combine two colors of floss to make the crests of the waves in the picture.

At the same time, my more fortunate cousins were being introduced to counted stitch embroidery. Their father was Norwegian and so they learned much in their travels, eventually gifting my mother with this piece.


But needlework options were limited in the American market (at least at the stores I went to), so I continued on to crewel embroidery and began a long association with Elsa Williams kits.

Dated 1968, when I was 12

It wasn't until I went to college in the 1970s that counted cross stitch made a splash in the states. I duly made a replica of the Wren Building at the College of William and Mary ...

Dated 1976, when the Bicentennial helped renew interest in needlework

and began the "Chase Sampler" which was based on a piece in the holdings at Colonial Williamsburg (it also became my wedding gift to Don, albeit in somewhat incomplete form).


When I graduated from William and Mary, I got a job in a local needlework shop, then moved on to a library assistant position at Colonial Williamsburg. That's when my work life truly got interesting. I'll conclude with a Colonial Williamsburg News article published in 1981 and leave for another day my more recent adventures in needlework.

- Williamsburg Memoir: Mixed Media Collage


In the thirty-some years that we were in Williamsburg, we lived in four different houses. This mixed-media collage entitled Williamsburg began with a wonderful ramble through the hundreds of (unorganized) pictures we have taken. I created two piles of potential images: exterior shots and pictures that evoked the years we spent in each home.  As I worked, Don would look in from time to time, shaking his head trying to figure out where I was headed. Me, too. But as so often happens when I'm writing, the project began to direct itself.


I began by making the houses using some pretty unorthodox processes. Since I didn't have any "perfect" exteriors to work with, I scanned pictures of the roofs, doors, windows, and siding for each house.

110A Harrison Avenue where we spent our first years as newlyweds

Then I cropped and scaled the various elements until I had fairly compatible images to work with. The end results were printed onto matte photo paper using an inkjet printer, then coated back and front with matte acrylic medium (which is more transparent than Mod Podge).

127 Wilson Circle where we became a family when Meghan and Melissa were born

Next I cut out roofs, windows, doors, and siding with an Exacto knife, inserted the chosen photographs behind each window, and gingerly tacked everything together with small bits of tape.

260 Nina Lane where the girls spent their school years & home to epic Christmas trees

Finally, I machine-sewed each house onto repurposed white cotton quilt pieces (not a real quilt, a store bought, machine-made quilt ... which is why it was in play for repurposing). I trimmed away the excess quilt material, edged the top, sides, and bottom of each house with permanent charcoal gray marker, and sealed each piece with another coat of acrylic matte medium.

303 Hempstead Road where we survived the teen years
and finally wrote GTT (Gone to Texas) on the door after retiring

After which I confronted a very large (16" x 20"), very white piece of foam core board. Talk about a blank page! A new search ensued for imagery to place behind and alongside the houses. Eventually I came up with a map of the Williamsburg area from a Colonial Williamsburg Journal to serve as the base. Because it wasn't quite large enough, I added dictionary pages with the words "Williamsburg" ...

 and "Virginia," a hand-drawn map to our house at Wilson Circle ...


a garden plan and "Home of the Month" sign from Nina Lane with a description written when Meg was in elementary school ...

"You'll know it's my house when you see it
because on the front of my house there is a big garden. It has lots of
flowers and has little and big plants. There are also vegetables and fruits."

and a key from I-don't-know-where with moth wings from our Texas garage (a metaphor for flying away from Virginia?) completed the stash ... most of which was liberally dabbled with thinned-out acrylic paint to unify the background.


In the end, I called it a success when Don said the collage brought tears to his eyes. It's a wonderful life we've led ... with the promise of much more to come.

Postscript: After reading this post Don asked, "Why didn't you include the thing under the Wilson Circle house?" My response was, "The keyhole? I didn't include it since it was one of those craft store things that I kinda regretted adding after the fact."  But then I thought about it and remembered I tucked something behind the keyhole: a tiny picture of the dollhouse made by Don's Dad when the girls were little.

So here it is, with thanks to my favorite editor for saving me from myself ... as always.


- Stumbling on Happiness: Altered Book Collage

Altered books and mixed-media collage have fascinated me to the point of buying numerous books and browsing through countless Pinterest pins. Two books have been particularly useful: Altered Book Collage by Barbara Matthiessen and Mixed Media Collage by Holly Harrison.

Trying my hand at creating my own collages has been gratifying and humbling by turns. I've decided to blog about two of them that made it to completion ... others have had less fortunate outcomes.


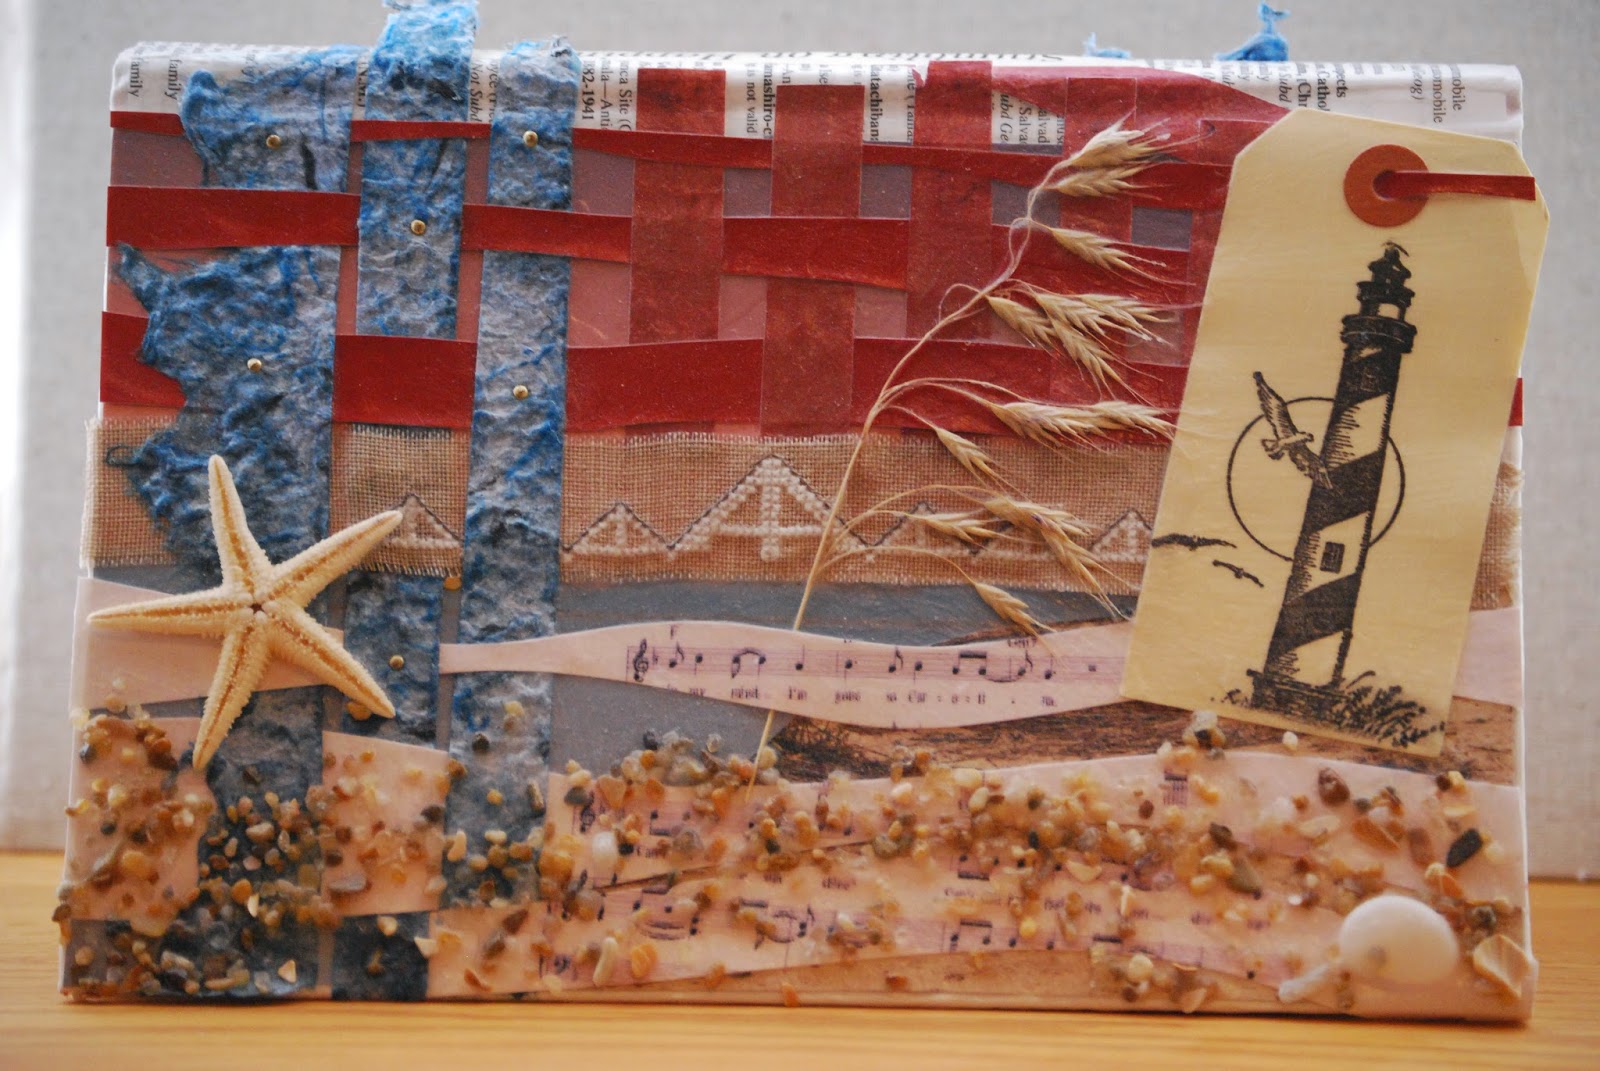
Stumbling on Happiness was created using a book I gave to my Mom the year before she died. I began the collage after we moved to Texas, so the title seemed apt. It has two sides representing the two places I most love: the Outer Banks of North Carolina and the Hill Country near Austin. The flags of each state informed the background colors for the two sides of the book. After priming the book with gesso, I used Mod Podge to attach a page of "joy" from the Library of Congress Subject Headings and the title of the book onto the spine.

I began with the North Carolina cover, weaving strips of blue handmade paper, lyrics from James Taylor's "Carolina In My Mind," and red paper from old book covers (one of the perks of being a former librarian).  I added a sea star from Melissa's wedding, sand and shell from Avon, a sprig of dried grass, a tag stamped with the Cape Hatteras Lighthouse, and a bit of needlework that I made many years before of an architectural element found at the apex of many OBX beach cottage rooflines.


The Texas cover featured the same blue handmade paper and strips of red, with lyrics from Walt Wilkins' "Trains I Missed," which became my driving-through-the-Hill-Country-to-work anthem. The rusted star was clipped from a garland I purchased in Gruene, the flowers were picked and pressed at our first (rental) home in Wimberley, the scissortail flycatcher was cut from a Melanie Fain notecard (see below for more on her artwork), and the needlework was from the same long-ago piece with stylized Galliarda (aka Blanket Flower), a wildflower found in both Texas and North Carolina. 

However, I have no illusions about the final product: while it gives me great pleasure, it also makes me appreciate how much time and practice goes into truly accomplished mixed-media collage ... or any  artwork, for that matter.


Now this is art: a hand-painted etching of a roadrunner by Melanie Fain. She has a wonderful link on her website about her etching process, which makes me appreciate her artistry all the more.

Saturday, March 15, 2014

- Rock On: Gardening in the Hill Country

When we first looked at our soon-to-be new home in 2010, the owners had amazing container plants on the front porch, but the ground in front was just grass. Of course, they took their plants with them, so we pondered how best to add visual interest to the front yard using what we had at hand.


What we had in abundance, especially on the floodplain at the back of the property, was rock ... lots and lots of rock. The soil profile for our land is called Rumple-Comfort, which is dominated by clay, brown cobbles of chert, and grey limestone. Don proceeded to create a ground cover of brown stone (after laying down landscaping cloth), finishing the first leg of the project late in 2011.


Realizing that we needed a way to walk from the front to the back of the yard without cutting across the porch, Don started moving around the brown stones, adding large limestone rocks for height, then creating a path with a "Texas Mix" of smaller stones from Gardenville ... one five-gallon bag at a time. Visual interest was provided by driftwood found on the nature trail that runs behind our property. A funky bench, some copper buckets, and a copper bird bath rounded out the second stage of the project in 2012.


The most recent (but certainly not the the last) phase involved putting in plants. Most are agaves and Spanish daggers grown from pups harvested from other parts of the yard, but this year's live Christmas tree also made the cut. In spite of my assurances that they looked fine, Don restained the cedar columns on the front porch ... a subtle but significant improvement.

Note the rain chain to the right ... now weathered to a brown patina.

The path has been extended around the west side of the house, winding past a small rock cairn and the HVAC system to the back of the house, where it now connects to the limestone rock garden, but that's a post for another day ... once the wildflowers are in bloom.

The reddish grass clumps are Little Blue Stem, a successful part of our effort to return much of the
property to prairie grass cover. The green clumps are sedges, which do particularly well under the live oaks.

Friday, March 14, 2014

- Rock 'n' Roll: Digging the Driveway

The Halloween flood in the Austin area was bad news for a lot of folks, some of whom got as much as 12 inches of rain. We were fortunate to only get 7 inches with no damage to the house.

The driveway, on the other hand, didn't fare too well. It was already in need of regrading and more gravel, so the flood made a bad situation even worse.


The gravel was scoured down to the bedrock in some places and much of it ended up in the field behind the house.


The good news is my daughter and son-in-law recommended CSK Pavers in Dripping Springs. CSK regraded the driveway and added 36 cubic yards of road base to fill in the low spots. They also moved some large rocks from the front and side yards, creating a rockwall to dam the end of the driveway. 


If it floods in the future, the dam should slow down the runoff enough to drop the gravel out of suspension. We've already had a dry-run of sorts (sorry, bad choice of words) when it rained 1.75 inches in two hours just a couple of days after work was completed ... everything stayed where it belonged.

Of course, if we have a true gully washer there will be a fair bit of gravel to relocate and a heckuva good opportunity for a workout.