Tuesday, November 18, 2014

- Scent-sational: Clean sheets and wood smoke

There's been some talk over at Grace's Windthread about the joy of air-dried sheets ... to which I would add the scent of wood smoke on a cold clear day ...


This was a fairly modest burn pile, only 6-8' in diameter and about 3' high. We got through all the accumulated  dead wood and brush in only three hours, compared to our last burn which was an all-day affair.

Since we don't have water piped out to the flood plain, we damped down the fire with cactus pads ...


 and having finished so quickly, we've already started piling up more brush for the the next time.

Sunday, November 16, 2014

- Triangulation: An idea for the pillow takes shape


It really is too big at 22x38 inches, but I'm determined to finish the woven cloth base for the pillow (shown here and here). There are parts that do not lie flat, but I've already envisioned stitching down tucks in the cloth, like folds of land.

Because what this is becoming in my mind (at least for now) is a record of our journey from San Marcos to Santa Fe to Saint Louis and back. The squares remind me of fields and their edges remind me of latitudes and longitudes ... the colors remind me of New Mexico's purple mountains and golden trees ... the stitches remind me of the endless miles of highway.

Then the most recent dye patch came out looking sun-like, which in turn made me think of a small woven patch I made last summer that is just like the crescent moon that rose over the Sangre de Cristo mountain range on our last morning at Ravens Ridge.

And as I pondered these things, Don came in with a half-sawed bit of rusted metal garden tool destined for his next folk art fish saying, " I know you like to get pictures in progress ... and wouldn't this be a cool shape for your dyeing?"


Yes and yes ...

Thursday, November 13, 2014

- Cutting to the chase: Progress on dyeing

I've been taking pictures as I go and realized today that I have a fair bit of catching up to do. So I'll cut to the chase ...

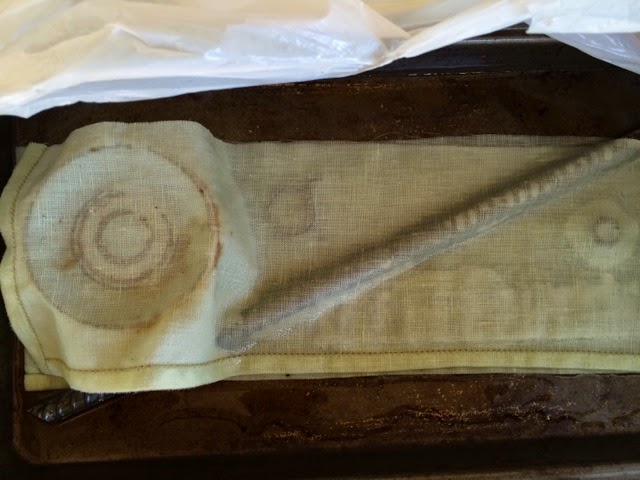
Rust, red onion, and windfall lichen on linen

The picture above shows samples my more successful dyeing attempts, including vinegar-induced rust on Don's grody road-find ...


Grody road-find to the left is 3" in diameter
Love Potion #9 alum and red onion "preserves" ...

I wanted to see if fresh cut onion works as well as onion skins.
Turns out it does as long as the onion is firmly in contact with the cloth

and India Flint inspired windfall lichen bundled in linen and poached for an hour in a hotpot full of tap water (after which it was left to cool overnight) ...

Note: I gathered well over two quarts of windfall lichen on our property in less than one hour
The canning jar to the left has water added to it, the one to the right has clear household ammonia

The acacia cassia pod dyeing was far less successful, as the three end products shown below were absolutely not worth the gag-inducing stench that accompanied opening up the canning jars ...

Original sheeting color (top)
Copper wire wrapped (1), Steel wire wrapped (2), and alum mordanted (3)

So, the grody thing has already been restaged with some indigo cotton and a rusty metal cap (found yesterday in the side yard, it nests into the grody thing like they were made for each other). Next time I won't get soooo excited about the results that I forget to put gloves on before picking up the cloth (my black-edged fingernails will be around to remind me for a while, I'm afraid).

I also went ahead and cut my 60-count linen weaving experiments off their shadowbox frame, since I now have a bead loom that is much easier to warp ...


and because one of the bits is needed for another dyeing project. More on that later ...

Wednesday, November 12, 2014

- Beyond be-leaf: A look back at Considering Weave

This past summer I spent the time from solstice to equinox in the cyber-company of considering weavers led by Jude Hill.


Early on, Jude challenged us to look for unorthodox looms and Jo posted some amazing bits of woven shell and driftwood (which inspired this post). Eyes opened, I gathered some Live Oak leaves on which to try my hand, cutting a hole in each one with cuticle scissors, stitching vertical "warp" threads with a single strand of floss, then needle-weaving "weft" threads into each one ...

Each leaf is a bit more than 1" wide and 2-3" long

As leaves are wont to do, they did dry out over time ...

After one month, the natural waxy coating
on the leaves became quite apparent
and one even blew away (to New Mexico), so this is how the remaining leaves look after 4+ months ...


But since Mo asked if I could post them on the blog to accompany her comments on The Leaf Dance, it's been fun to look back in the Considering Weave Forum and bring them out into the world.

Tuesday, November 11, 2014

- Impressions of New Mexico: Pueblo assemblage


While our trip to New Mexico did not include visiting the pueblos, we did make it to the Museum of Indian Arts and Culture in Santa Fe ...


The experience was deeply moving ... objects wrought of clay and cloth ... wood, bone, metal and stone transformed ... everything functional, yet rich with symbolism ... it felt sacred ... something I will simply never forget.

Near the end of the exhibit, Don saw a quote and beckoned me back. Photography wasn't allowed, so I wrote down part of it. Later I emailed librarian Allison Colborne at the museum asking for her help ... she referred me to Tony Chavarria, who provided the quote in full:
“Art” is not found in our language. But what do we call a piece of work created by the hands of my family?  What will we call that piece which embodies the life of its creator?  What will it be if it has a life and soul, while its maker sings and prays for it? In my home we call it pottery painted with designs to tell us a story.  In my mother’s house, we call it a wedding basket to hold blue corn meal for the groom’s family.  In my grandma’s place, we call it a Kachina doll, a carved image of a life force that holds the Hopi world in place.  We make pieces of life to see, touch and feel. Shall we call it “Art”?  I hope not. It may lose its soul.  Its life.  Its people.
Michael Lacapa, Apache, Hopi-Tewa

Upon our return to Texas, Don gathered stone, wood (from a $5 By the Bridge screen door) and paint, creating his own impression of New Mexico to "see, touch and feel" ... 


something to remind us of our sojourn until we find our way back ...  


Friday, November 7, 2014

- Pillow continued: Stitching a woven cloth base


After struggling mightily last night, I realized that I needed way more safety pins to keep the woven cloth strips from shifting while I stitched.


I also realized that stitching on either side of the strip borders wasn't turning out the way I wanted. Fortunately, I resisted the urge to tear last night's work out and start over. Instead, I just tried something else ...


It's a subtle difference that will result in half the stitching ... and with a bit of practice, I'm hoping the intersections will become more recognizable cross stitches.

Finally, for all you thread-nesters out there, here's my latest attempt at organizing my floss. I have to confess that I've always pushed the limits on thread length (30" on average), but I cut everything in half and secured it all with a bit of considered weave. So far, I haven't had to untangle a single thread knot.


And while I don't think I'll ever be happy about having to re-thread my needle more often, I do think the shorter thread lengths will encourage more color changes as I work. At least that's what I'm telling myself ...

Thursday, November 6, 2014

- Day 1: Starting a woven cloth pillow

I took a deep breath and started to tear my dyed cotton sheet into strips for a pillow. It was a radical departure for me: I didn't measure anything.

Instead, I loosely wrapped some harem cloth around the pillow base to get a rough idea of size, then laid ten lightly pressed strips of dyed cloth in a random pattern along its length.

Using Jude Hill's cloth-to-cloth weaving technique, more strips of cloth were woven across the width of the harem cloth. After pinning down the ends, I took a quick picture ...


then basted everything down around the edges. Here's a second shot, taken in lamplight ...


Since this is my first second try at cloth weaving (the first was the Sew/Sow Peace flag), I may regret starting with a 22x38 inch piece, but so far so good.

Stay tuned ...

- Extra, extra read all about it: Local quilter and natural dyer in the Statesman

I was delighted to read about an up-and-coming quilter and natural dyer in the Austin American Statesman this morning
... and while you can't get the full content online, the next best thing is to go to Maura Grace Ambrose's Folk Fibers website or check out her blog in the KINDRED SPIRITS links to the right. 

Tuesday, November 4, 2014

- Lindeheimer's Senna (NOT Acacia pods as first reported) join the Love Potion #9 dye test


[Note: Red addenda were added in 2015] After finding no persimmons left to harvest I googled acacia pods, which we do not have in abundance. Learning that green and/or yellow dye might be possible, I gathered up Lindheimer's Senna (Cassia), which I mistook for acacia. Then I picked out the least successful attempts from the round of tan sheet dyeing and bundled them up in canning jars with used tea bags and boiling water. As with the first round of tan sheet dyeing, I'm trying a copper wire batch, a steel wire batch (haven't gotten steel wool yet, but I shook in some rusty nails for good measure), and an alum batch. The results were awful ... both color and rank odor.

They are now waiting patiently alongside Love Potion #9 (the first jar on the left) and color is most definitely happening.

Monday, November 3, 2014

- Updating a classic dessert: Cream puffs

Cream puffs were my Mom's go-to for a quick, easy dessert that always got rave reviews. She would make a batch of 8 large puffs, fill them with a vanilla pudding/whipped cream mixture (recipe here) and top them with hot fudge sauce (recipe here).

1 vanilla/ganache cream puff and 2 pumpkin/rum sauce cream puffs


Recently I've gotten rave reviews from Griffin and Jackson ("mmmmmmmm") for an updated take on cream puffs featuring mascarpone filling and ganache topping. I make the puffs much smaller, which is better for little hands and makes it easier to stage a variety of fillings. However, when I went to make the latest batch today, I remembered I never did get around to putting cream puffs on the blog (except as a gougere recipe).

So here they are ... updated for the 21st century.

Cream Puffs (serves 4 adults plus one grandchild)

1/2 cup water
4 Tbs. salted butter
1/2 cup flour
2 eggs (preferably from pastured chickens that get to eat bugs)
pinch of salt

Bring butter and water to a boil in a small saucepan, then turn off the burner.
Stir in flour and salt with a wooden spoon.
Add one egg and beat like crazy with the wooden spoon until fully incorporated.
Repeat with second egg (don't try to beat both eggs at the same time).
Using a small scoop or a teaspoon, place 20-24 balls of dough on parchment paper.
Bake at 400 degrees for about 15 minutes. Continue to bake until golden brown.
Cool on a wire rack


Mascarpone Filling

8 oz mascarpone cheese
1/2 cup heavy cream
1/8 - 1/4 cup sugar (I start with 1/8 and add more to taste)

Beat until stiff (time will depend on how firm the mascarpone is to begin with ... recent purchases of a new brand have required a lot more time since it is quite soft)

Divide into multiple batches and flavor with:
  • Vanilla (for little ones, 1 or 2 tsp. vanilla extract)
  • Espresso and Drambuie (for more adult tastebuds, about 1 Tbs. espresso powder and 1 Tbs. Drambuie in a half batch of mascarpone filling)
  • Pumpkin and Barbancourt (tried for the first time today in a half batch of mascarpone filling mixed with 1/3 cup canned pumpkin, 2 tsp. finely minced fresh or sushi ginger, 1/2 tsp fresh grated nutmeg, 1 Tbs. Barbancourt rum)
  • Freestyle with whatever spices, flavorings, and/or alcoholic beverages you have on hand
Beat each batch to combine, taste and adjust as needed, being sure to go easy on the sugar since the toppings add a lot of sweetness.

Ganache Topping (recipe here)

Best with vanilla or espresso/Drambuie fillings
Optional: garnish with toasted hazelnuts or almonds

Butter Rum Sauce Topping

1/2 cup brown sugar
1/8 cup heavy cream
1 Tbs. butter
1/8 cup Barbancourt rum

Combine brown sugar, cream and butter in a small saucepan and bring to a boil. Keep at a slow boil for 3-5 minutes, whisking occasionally. Remove from heat and cool for a few minutes. Stir in rum. Note: this sauce may crystallize if it cools before using ... be sure to heat and sample before serving.

Best with pumpkin filling
Optional: garnish with toasted pecans