Thursday, May 28, 2015

- Just be(e)ing: Exploring the Art.Science.Gallery in East Austin

Another gray day ... hot and humid ... no rain the the forecast, but raining nonetheless.

More sadness in the papers, more tragedy born of flood.

And in the midst of it all, we found art. More specifically Art.Science.Gallery ... on the east side of Austin, it turned out to be one of many galleries and studios in The Canopy, to which we will surely return.

The Buzz Stops Here was in its last week. Having read that the exhibit was focused on encaustic and bees, I figured it would be worth a look. I figured rightly.

Most of the pieces took full advantage of the soft golden hues of beeswax and honey. Two in particular made me reach for my camera (after ascertaining that photography was permitted, of course). 


from which hexagonal cells of waxen kozo paper ...


fell to the floor like so many dead bees ...


with finely wrought dimensionality ...

Note the fine golden thread in the center of the flower

and detail ...


All more artfully photographed and described in this online catalog, but there's something about trying to capture images for oneself that helps recall the quietude of moments spent just looking, appreciating the gift of be(e)ing ...

Sunday, May 24, 2015

- Safe: Memorial Day flooding in Wimberley

Note: this post was written on Sunday, May 24. Details on the flood have since been updated in the local news and broadcast media.

-----------------------------------------------------------------------------

It's never good when your hometown makes national weather news, as we did today in the NY Times ...

Our home, located on high ground midway between Wimberley and San Marcos, is fine. However, flooding downstream has knocked out our internet, leaving us with limited news access. We did drive down Ranch Road 12 toward Wimberley, but were turned back at the bridge ...


The river crested over 40' last night, covering the bridge with water and debris, stripping away guard rails and doing who knows what structural damage.

Standing 40 yards from the still-roaring Blanco River, we looked around us and realized there was debris caught in the tree branches over our heads ...


bark had been flayed from wood ...


cloth hung suspended ...


a house was torn from its foundations ...


just one of 350 many homes swept away. Three Wimberley residents are still missing. Twelve people died.

We are humbled by this incredible show of nature's force ... and thankful to be safe.

Friday, May 22, 2015

- Only one out of eleven, but no complaints: Wildflower dye trials

Well, the re-dye trial results were pretty disappointing overall. The steel wrapped cloths were gray-day sad and most of the copper wraps were ho-hum yellows.

But there was one happy exception: the burgundy and gold petals from the Mexican hats ... 


So the new plan is to wash out the steel wraps ...


and the copper wraps ...


then over-dye them all with as many Mexican hat petals as I can harvest before the flowering season ends. Shouldn't be too hard to do ...


- In a pickle: Taking a second pass at the dye trials

I decided to do some re-dyeing using cloth from the less-than-wonderful results of my earlier dye trials (I did keep all six of the lichen and onion trials, along with one alum-mordanted Salvia amistad), So seven new bundles for good luck: 
  • Mountain pinks (I think) from the floodplain
  • Twin-leaf senna ditto
  • Mexican hats aka Thimbleflowers with dark burgundy and yellow petals from the side yard (bundled in what I think was the alum-mordanted red cabbage cloth from the previous trial)
  • A second Mexican hats bundle with yellow petals only
  • Lantana and Indian blankets from the floodplain and garden (mixed together)
  • Arugula stems with coffee grounds (fished out of the compost bowl)
  • Mealy blue sage (reapplied to the previous alum-mordanted mealy blue trial)
All wrapped in copper wire and steeped in a copper pot for half an hour with alum, vinegar and water (aka pickle juice) ...


Then, four more bundles added later, because there were still some other pieces of cloth that weren't all that great ...
  • Dried rosemary (from a spice jar that I think came with us from Virginia six years ago)
  • An unidentified woody floodplain herb (probably a weed, but I love the resinous scent ... later identified as Prairie Tea)
  • One whole prickly pear flower (which I discovered has spines ... ouch)
  • And uh ... something else ... oh, now I remember ... large pieces of windfall lichen (I've used smaller bits in the past, but the recent rains have gifted me with several lichens over 1" in diameter)
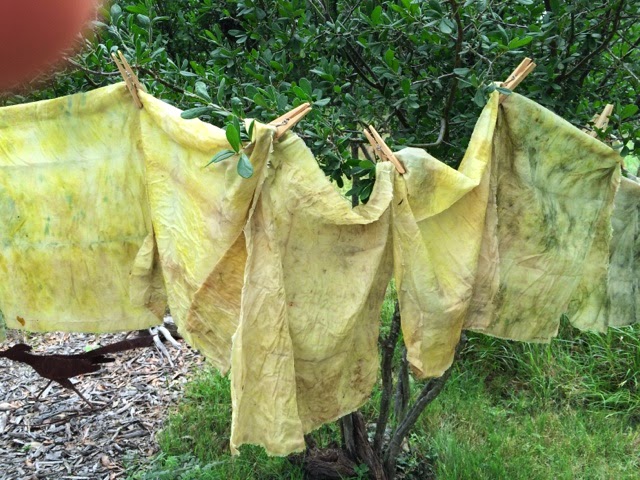
All four were re-bundled in the bungled steel wire dye trials, re-wrapped in steel wire and put in the copper pot, which was then rewarmed on a hot plate for 20 minutes or so. A few hours later, because I couldn't leave well enough alone, I tipped all the bundles upright, left them overnight, then found them looking like this in the morning ...


Most (but not all) were labelled with a sepia Pitt pen before being rolled up ... it should be interesting to see if it survives the dye pot. Also, all the dyestuffs were laid out and folded as they were here, but at right angles to the previous dye trials, fold lines from which were still visible in varying degrees of faded-ness. I was hoping to get a nine-patch effect, but at this point I'm sort of disappointed to see that there isn't much happening along the fold lines.

Now the question is, how long to wait ...

Tuesday, May 19, 2015

- Measure twice, stitch once: Building a house of cloth

I love precision. The careful counting of threads on an unmarked cloth  ...

Single strand of DMC cotton floss back stitched on 50 count linen

And I come by this obsession honestly. First, influenced by my cousins, whose Norwegian relations introduced them to counted cross stitch long before it made its way to the States. Then, as an aspiring Needleworker for Colonial Williamsburg (where I created my own dream job, then walked away ... long story), influenced by the Ann Pasteur Maupin sampler acquired in 1981 and pictured here. Worked by a ten year old, the b-side of the sampler was virtually the same as the front. You can also see the sampler reproduced here in kit form  (I just discovered the link today).

In the beginning of my own counted stitching I had relied on even-weave cotton cloths like Hardanger and Aida to regulate my stitches ... then graduated to evenly woven linen, with its variations in thread thickness. I quickly learned that cross stitches could slide under a tabby weave, the desired diagonal becoming an undesirable straight stitch if pulled a little too tight. And thus it became clear to me why Ann Pasteur Maupin was taught a three-part cross stitch: by repeating the first diagonal of the cross the stitch was "locked in" before adding the opposing diagonal, thereby achieving something close to a mirror effect on the b-side ...

B-side of three-part cross stitches


But these days I'm sorta over cross stitch. Been there, done that. Movin' on ...

And yet ... and yet ... I do love precision.

So what's next? A new Kitchen Towel series to warm my daughter's new house, which is currently under construction ...

The living room looking out onto the patio


Local limestone worked by some very talented stonemasons

First in the series will be a rendering of the house plan designed by my son-in-law and drafted by the builder. The base cloth is a piece of Belgian linen from a repurposed duvet cover, the color neither blue nor green ... a color as variable and sensitive to light as the sea and equally hard to capture in a photo. After copying and pasting the house plan PDF into Word (I've just never gotten into PhotoShop, so I make do with what I know) ...


I blocked out the extraneous bits and reprinted the house plan on some "vellum" inkjet paper that I bought some time back, figuring it might come in handy ...


It took a fair bit of time prepping the cloth, first hemstitching the towel at the rate of fifteen doubled stitches per inch over the 14 x 24 inch dimensions (that's 28 plus 48 times 30, almost 2300 stitches) based on one of my favorite towels from the original kitchen towel series ...


After which, harem cloth was obsessively basted to the back: about fifty rows of thirty stitches each ...


In other words, there were nearly 4000 stitches in the cloth before I even began to stitch the house plan ... the plan that had been re-sized and printed to match the towel size without too much thought to ultimate stitch size, believe it or not. But the printout ended up scaled almost perfectly to sixteenths of an inch. Which was helpful, since the linen averaged about three threads to a sixteenth of an inch.

I began stitching the dining room since it was somewhat central, using the dimensions of the inner walls as a guide after discovering that the printed plan was pixilated to a degree that required some fudging of details. Likewise, the variations in linen thread thickness from whisper-thin to slubby added another dimension of uncertainty ...


Still, I found my rhythm and soon began intuiting quarter-inch doorways and single-stitch window frames, inner walls and outer walls, which details to leave in and which to edit out ...


Even so, I was somewhat surprised (and more than a little relieved) when I found myself back in the dining room with all the walls matching up after circling clockwise from bedrooms to great room to master suite to garage. Not that I actually measured twice and stitched once. I confess there were many times I retraced my steps after stitching a line too far. But I'm well pleased with the results ...

A-side


And delighted to learn-by-doing that the harem cloth added a degree of stability that made my counted work much easier than it ever was on plain linen ...

B-side


B-side close-up

Now all that is left to do is add a few more details, baste on another layer of harem cloth as a backing, and quilt the three layers together ... but that's for another day, another post.

Monday, May 18, 2015

- Worth waiting for: On the banks of Sink Creek

Looking upstream

In the nearly five years that we have lived on our homestead I have never seen Sink Creek. Oh, there was evidence of its existence on the aptly named flood plain, but whenever there was a gully washer I was either at work or it was the middle of the night or there was too much thunder and lightning to safely go outside.

Until yesterday, when the storm clouds dumped 3.5 inches of rain in a  few hours, making a river out of our front yard ...


then quickly pushing off to the east, enabling me to finally take a look before the water soaked into the aquifers below. 

Our fire pit, which has stood unused through the recent years of drought, became a nascent mosquito pool ...


So I undammed one end to let the water drain out ...


Slogging through the recently mulched West Trail lichen farm, we were glad to see that our efforts were worthwhile as the water pooled under the branches without breaking through and washing out the path as it had in the past ...


But it was the flood plain that inspired the most excitement. Water was moving, rapidly ...

The creek already receding ... sinking into the earth

and up to a foot deep, carrying with it seeds and silt, Mother Nature's best planting method ...


Indeed, last year's heavy rains carried bluebonnet seeds from upstream where they bloomed for the first time on our property earlier this spring ...


With this most recent deluge, I have no doubt new seeds have been spread even farther downstream.

But it was the voice of the water, chuckling through the rocks, that most delighted me (if only I could figure out how to insert a video into Blogger, you could hear it, too). Instead, I'll just leave you with one last look from the headwaters of Sink Creek ...

Looking downstream

already gone, but not forgotten.

Wednesday, May 13, 2015

- Triangulation: The last word

Jude Hill has been talking about measuring in her Small Journeys on Spirit Cloth ... or more accurately, about not measuring. About trusting the process and one's own internal measure.

Which makes sense. When you think about it, we're all pretty good at measure. Think of tipping your head while looking at a picture on the wall and saying, "That's not quite level" ... then confirming it with a level, as if you really needed it.

For years I have reveled in clean-the-fridge cooking, where there always seems to be the right amount needed for a pasta or a salad, a soup or a sandwich. I made bread at my daughter's recently and there was just enough bread flour in the bag for what I needed. I love it when that happens.

But it takes practice to trust one's gut, to accept the unexpected, to internalize the measure of things.

And so ... Triangulation was a huge leap of faith for me. Made without measuring, without a plan ... strips of cloth torn and woven together ... then stitched and stitched and stitched again until its integrity was sure in my hand ... then wrapped around a piece of stuffing that had been free-cut from an old body-length pillow months before ... finally safety pinned and ladder stitched together.

Resting at last on the couch, a-side ...


or b-side, depending on how it falls ...


The top seam more obvious ...


the back seam less so (it's the second from the right) ...


There is much to be said for not measuring.

Monday, May 11, 2015

- Doing the right thing: Stitching an image from Etsy


This post will be longer than usual, but it’s a story worth telling I think.

Earlier in the year I “signed on” to a Facebook post from a friend. Called “Pay it Forward,” the idea was that she would send something during the course of the year to the first five people who responded “I’m in.” The catch was that you had to do the same. So I did.

Of those who responded to my “Pay it Forward” post, one was a long-ago church friend from Hickory Neck. Back in the day, we were both active in the Cursillo movement and spent many weekends ferrying back and forth from Williamsburg to Camp Chanco in Surry. Often we would see great blue herons on the James River, which my friend Judy called her god birds. Ever after, when I saw a great blue fly overhead, it lifted my spirits. Judy went on to retire from teaching and attended seminary, after which she became an Episcopal priest. Since I loved making altar linens, I created a miniature set for her travel communion kit. In all likelihood the linens are long-since disintegrated, but the thought of them still makes me happy.

I in turn carried a gift from Judy on various keychains for many years --a penny with a cross cut out of its middle-- most recently on my mailbox key ring. I wanted to use that penny in some way for Judy’s pay it forward gift, so I set it between two layers of cotton muslin, drenched it with vinegar and salt and placed in on a sponge. Then I let it sit for well over a month, dripping a little more water over it every so often [those of you with Christian backgrounds are probably nodding your heads over the time period and the vinegar sponge references, but truly they were not intentional at the time  .. only in hindsight]. After a while, the copper in the penny left a faint circular impression surrounded by a pale blue-green halo. Not exactly the dramatic result I was after, but it was what it was.

I began to wonder what to do next. Remembering the god bird, I googled an image search for great blue herons and came upon a simple line drawing by Kim Moore on Etsy. My first thought was that I could try making one of my own, but that didn’t feel right. So I wrote to Kim and asked if I could purchase the right to copy her image and create a piece of needlework. And then waited … and waited … finally deciding that Kim must have thought I was a spammer. Until out of the blue, she responded with an explanation that she had recently completed her masters and was just getting around to my (unusual) request.

We negotiated an agreement that I could make one reproduction of her heron image in needlework for the cost of the line drawing. I also offered to pay for the privilege again if and when I ever made another. Kim created a special one-time listing on Etsy and I paid her with my credit card. It was so simple to do and it felt incredibly “right.” I also told Kim I would provide a link to her work at the Etsy shop (here) and was delighted to also find a profile of her in Dharma Trading, a favorite stop for many of us in the stitching blog-world. 

As for the process of converting her art work into stitch … I copied the heron image into a photo editor to eliminate some stray background color, then pasted it into a Word document and made a test print to see how it would look. After a little tweaking, I ironed a piece of muslin to freezer paper, cut it to 8 ½ x 11, crossed my fingers and sent it through my old HP 932 inkjet printer (since it's 15 years old I would have been sad if the printer jammed, but not freaked out). Fortunately, no funeral was needed for the printer and I was delighted beyond words by my first attempt at printing with my own fabric rather than the stark white printer fabric from the office supply store that I had used in the past.

I tore the heron picture roughly to size (safe in the knowledge that I could always print another), then tore the penny cloth with a bit more trepidation, knowing that it would take at least a month to create another if things went wrong. After trying several layouts, I invisibly basted both pieces to some windfall lichen-dyed muslin (thank you Jude Hill and India Flint) and began to stitch.

Debating with myself about whether to keep with Kim’s black-on-white image, color won out and I picked several soft shades to complement the watery blue-green cloth. For the sky I chose kantha stitch, leaving the face of the orb clear (sun or moon I leave for you to decide). For the heron I chose Jude’s split backstitch, which put me in mind of feathers and grass seed heads.

After taking a b-side picture ...


I put it into a 5x7 mat and took one more shot …

then let it fly away home.

Saturday, May 9, 2015

- Potholder take 2: Nana Kantha and the Texas Two Step

Well, here's where I ended up on this latest potholder trial (repurposed in August 2015 as part of the Table Series) ...


And maybe all you need to know is that it consists of four layers of tea-dyed tablecloth linen and eight layers of eco-dyed sheeting stitched together with floss. Or you can follow me through the process, since I want to document it before I forget what's hidden in all those layers.

The project started with cotton sheeting from last year's dye trials torn into 7" squares. My first idea was to stitch pairs of the sheeting together, pile them up until I had a good thickness for a potholder, then stitch them all together zokin-style.

Except the cloth didn't feel like it would work the way I envisioned, so I tore up 7" squares from an old linen tablecloth and tea-dyed them so the colors would meld with the sheeting ...

Tea-dyed tablecloth linen on the left, eco-dyed sheeting on the right

Then I tried pairing the sheeting and linen, but it still didn't "feel right" ... so I tore two squares of the sheeting into three strips each, wove them together into a nine-patch, invisibly basted them to a piece of linen and Kantha stitched them. Much better, but still not quite right ...


Next I tore two squares of sheeting into four strips each, wove them together into a sixteen-patch, basted them to the linen and tried the Combination Stitch from the end of this post which I soon began thinking of as "two steps forward and one step back stitch" ...


Not only did it look kinda cool on the a-side, it had a pretty neat effect on the b-side ...


Figuring "nothing ventured, nothing gained," my third take consisted of two squares of sheeting torn into five strips each and woven into a 25-patch ...


invisibly basted and then stitched to the linen square with variegated floss ...


That's when it hit me that the stitches reminded me of Morse Code. Curious, I looked up "dash dot" and "dot dash," which just happen to stand for "n" and "a" respectively. Nana! Nana Kantha! 

And the back? Texas Two Step of course ...


Thoroughly full of myself and my corny word play, I put the three three-layered cloths together. Only to find they still didn't feel thick enough to make a trustworthy potholder. So, one more pass was needed ... but what?

There was a piece of tea-dyed linen that I especially liked, so I backed it with two squares of sheeting woven into a sixteen-patch, basted them together, and started (discontinuous) backstitching around the edges of the stains ...


When it was done, the b-side was almost (but not quite) as interesting as the front ...


Twelve layers (four cloths of three-layers each) finally felt like enough thickness, so I contemplated which of the eight a-sides and b-sides would become the final a-side and b-side of the potholder.

Since they were the least inspiring, I didn't think twice about basting the nine-patch and the sixteen-patch together to be the invisible middle of the potholder. And yes, I used invisible baste with a backstitch ... not for the sake of appearance, but because I've discovered that basting with a tiny backstitch is virtually impossible to undo and therefore gives the most stability.

It was a given that I wanted the outlined tea stains to be visible on one side of the finished product. But I surprised myself by choosing the b-side of the 25-patch to be the on other side of the potholder ...


It must have been something in the wind(thread) ...